
Prerequisite
- 정적 웹 호스팅에 사용할 S3 Bucket이 준비되어야 합니다.
- 사용할 정적 파일이 필요합니다.
Process
1. S3 버킷 생성하기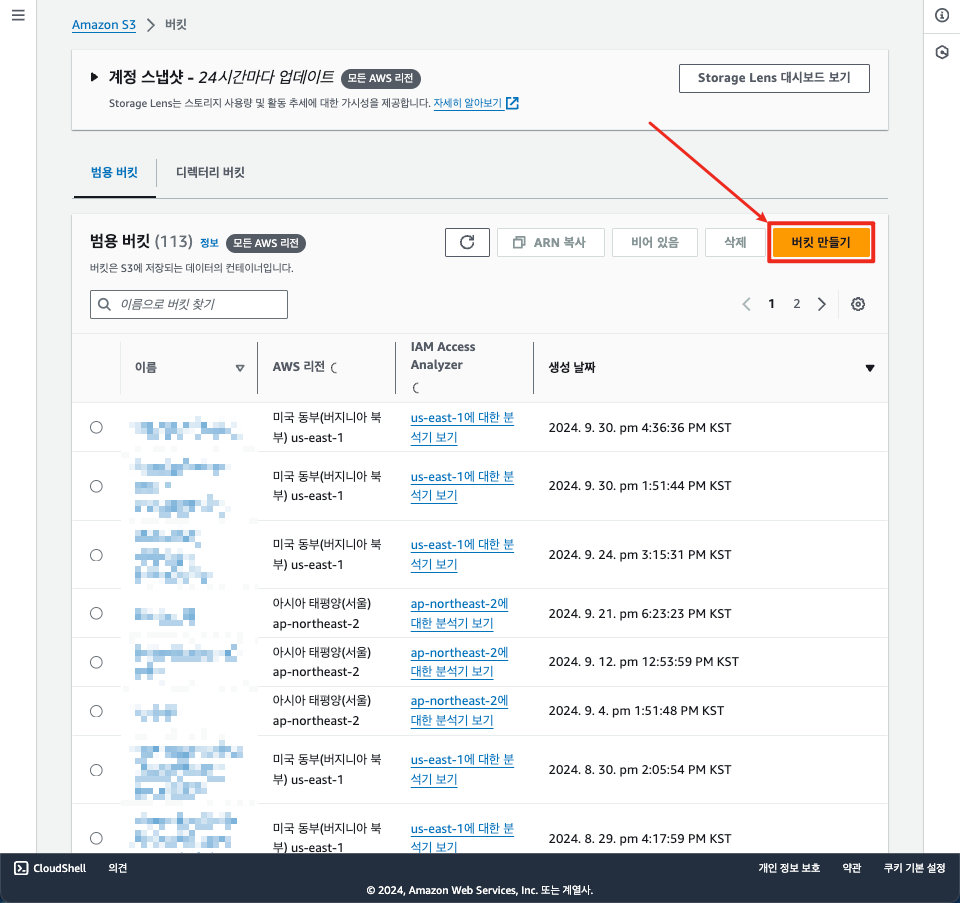
- S3 서비스에서 버킷 만들기를 선택합니다
1. 이름을 지정합니다.
S3 버킷 이름은 모든 AWS 리전과 모든 AWS 계정에서 전역적으로 유일해야 합니다.
고유성의 이유:
- 충돌 방지: 다른 사용자의 버킷과 이름 충돌을 방지합니다.
- 보안: 버킷 이름의 고유성은 보안의 한 계층으로 작용합니다.
- URL 생성: 각 버킷은 고유한 URL을 가질 수 있습니다.
- 퍼블릭 액세스 차단을 해제합니다.
-
체크하지 않으면 버킷 생성이 되지 않으므로 안내사항을 반드시 체크합니다.
-
체크하지 않으면 버킷 생성이 되지 않으므로 안내사항을 반드시 체크합니다.
이후 원하시는 보안 옵션 및 태그를 할당하여 버킷을 생성합니다.
아래와 같이 생성된 버킷을 확인할 수 있습니다.
2. 정적파일 업로드 및 S3 Web Hosting 설정하기
테스트 버킷 코드와 이미지입니다.
- web: index.html
- image: wr-home-top.jpg
(파일명에 주의하세요.)
<!doctype html>

<html lang="en">
<head>
  <meta charset="utf-8">
  <style>
    body{
        font-family:'Segoe UI', Tahoma, Geneva, Verdana, sans-serif;
    }
    .site-header .title{
        background: url(wr-home-top.jpg) no-repeat top;
        background-size: cover;
        padding-bottom: 70.2753441802%;
        margin: 0;
        text-indent: -999em;
        position: relative;
    }
    .home-about {
        background: #f50856;
        color: #fff;
        padding: 5rem 0;
        text-align: center;
    }
    </style>
  <title>Wild Rydes</title>
</head>

<body>
    <header class="site-header">
        <h1 class="title">Wild Rydes</h1>
    </header>
    <section class="home-about">

        <h2 class="section-title">How Does This Work?</h2>
        <p class="content">
            In today's fast paced world, you've got places you need to be but not enough time in your jam packed schedule. Wouldn't it be nice if there were a transportation service that changed the way you get around daily? Introducing Wild Rydes, an innovative transportation service that helps people get to their destination faster and hassle-free. Getting started is as easy as tapping a button in our app.
        </p>
        <h2 class="section-title">Our Story</h2>
      <p class="content">
        Wild Rydes was started by a former hedge fund analyst and a software developer. The two long-time friends happened upon the Wild Rydes idea after attending a silent yoga retreat in Nevada. After gazing upon the majestic herds of unicorns prancing across a surreal Nevada sunset, they witnessed firsthand the poverty and unemployment endemic to that once proud race. Whether it was modern society's reliance on science over magic or not, we'll never know the cause of their Ozymandian downfall and fade to obscurity. Moved by empathy, romance, and free enterprise, they saw an opportunity to marry society's demand for faster, more flexible transportation to underutilized beasts of labor through an on-demand market making transportation app. Using the founders' respective expertise in animal husbandry and software engineering, Wild Rydes was formed and has since raised untold amounts of venture capital. Today, Wild Rydes has thousands of unicorns in its network fulfilling hundreds of rydes each day.
      </p>
    </section>


</body>
</html>
앞서 테스트 코드로 index.html을 생성하여 업로드합니다.
S3 Bucket 의 속성에 정적 웹 사이트 호스팅을 확인 합니다.
인덱스 문서 등록 및 정적 웹 사이트 호스팅을 활성화한 후 변경 사항을 저장합니다.
3. 웹사이트 확인하기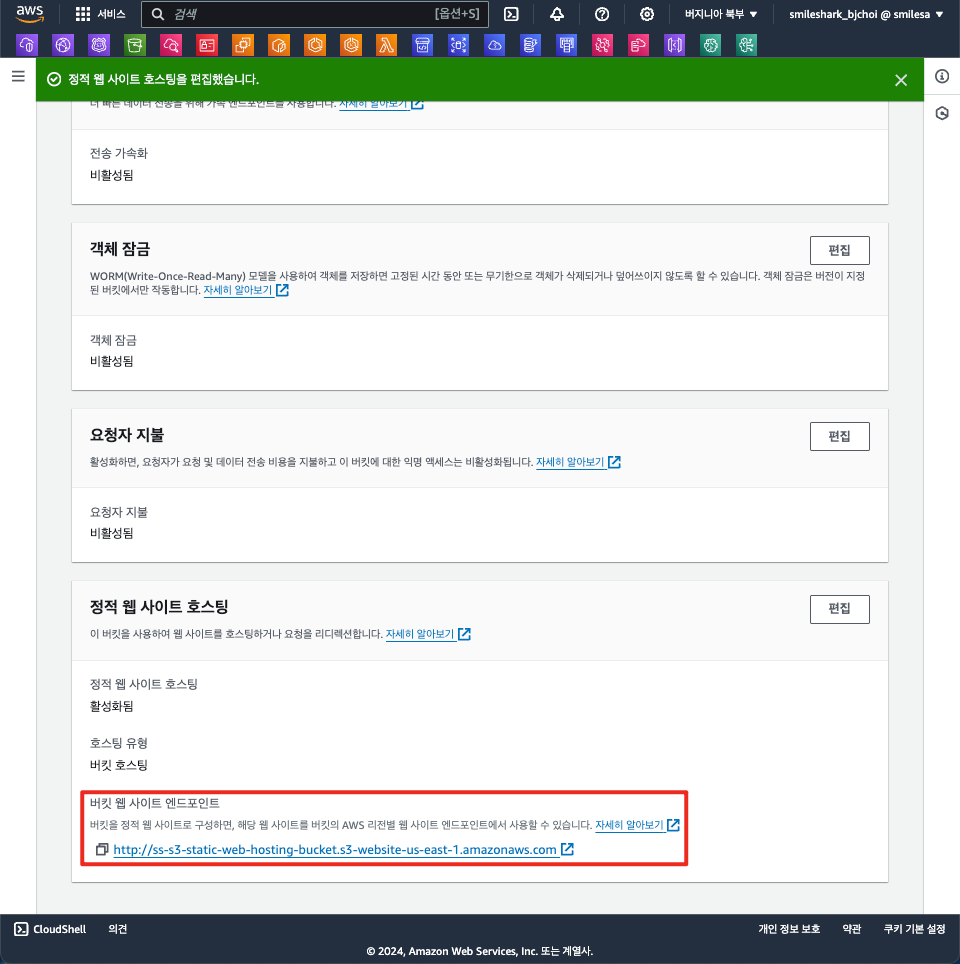
- 저장 후 웹사이트 엔드 포인트를 클릭하거나 브라우저에 복사 후 붙여넣기를 합니다.
4. 오류가 발생한다면?
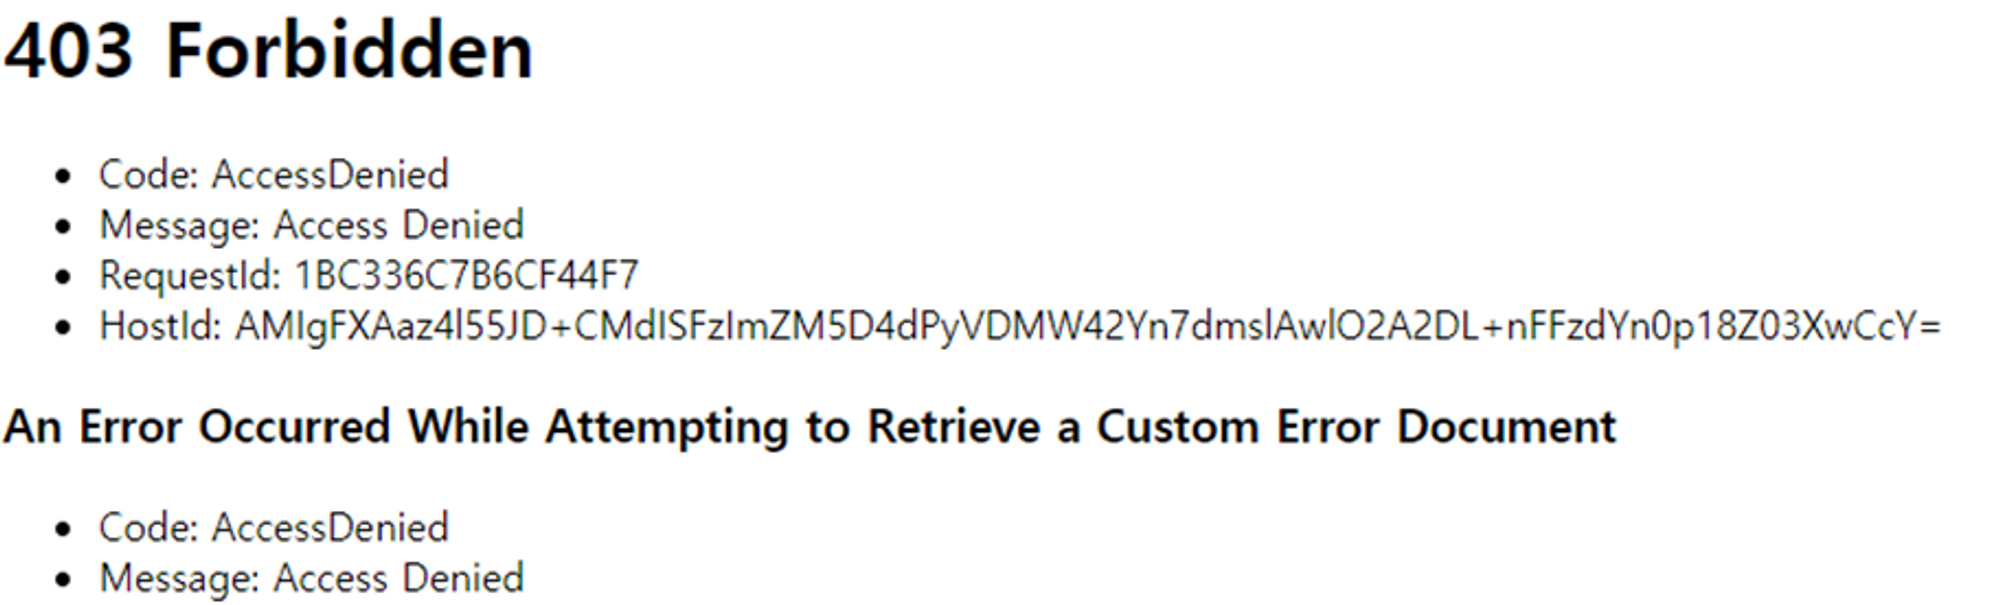
1. Object에 Public Access 설정을 하지 않았거나
개별 파일 설정 필요합니다
2. 버킷에 대해서 Public Access 설정을 하지 않았거나
버킷 정책을 설정하므로 추후 파일 추가시 반복적인 작업이 필요하지 않습니다.
따라서 해당 버킷을 정적 배포용으로 사용하려 하신다면 적합한 방식입니다.
3. 웹사이트 호스팅 시 index document에 입력한 Object 파일이 존재하지 않거나
파일명, 확장자, 업로드가 정상적으로 되었는지 확인합니다.
🦈 1. Object에 Public Access 설정을 하지 않았거나
ACL(Access Control List)을 사용하여 프라이빗한 버킷 내의 특정 객체만 퍼블릭으로 설정한 경우 활성화됩니다.
- 파일 선택 후 [ 작업 ] 을 클릭 후 [ACL을 사용하여 퍼블릭으로 설정]을 클릭하여 활성화합니다.
🦈 2. 버킷에 대해서 Public Access 설정을 하지 않았거나 (가장 추천하는 해결 방법입니다)
⚙ 추천 드리는 이유는 버킷 안의 Object를 하나하나 Public으로 설정하면 추후 파일을 추가할 때마다 Public으로 설정해야 하는 번거로움이 있습니다. 버킷 자체를 Public으로 설정하면 파일을 추가 시 자동으로 Public으로 설정되기 때문에 번거롭지 않습니다.
- S3 bucket 목록에서 생성한 S3 bucket을 선택 후 [권한]을 선택합니다.
- 버킷 정책을 [ 편집 ] 선택 후 [정책 생성기]를 누르신 후 특정 작업을 지정하여 생성하시면 쉽게 생성 가능합니다.
- 정적 버킷용으로만 사용하실 계획이라면 아래 정책 코드 예시에서 [your-bucket-name]을 수정 후 등록합니다.
정책 코드 예시입니다.
{
    "Version": "2012-10-17",
    "Statement": [
        {
            "Sid": "PublicReadGetObject",
            "Effect": "Allow",
            "Principal": "*",
            "Action": "s3:GetObject",
            "Resource": "arn:aws:s3:::your-bucket-name/*"
        }
    ]
}
테스트 버킷 예시입니다.
{
	"Version": "2012-10-17",
	"Statement": [
		{
			"Sid": "PublicReadGetObject",
			"Effect": "Allow",
			"Principal": "*",
			"Action": "s3:GetObject",
			"Resource": "arn:aws:s3:::ss-s3-static-web-hosting-bucket/*"
		}
	]
}
정책생성기 예시입니다.
- ARN 입력 후 반드시 끝에 *“/ “**를 넣습니다.
- 생성된 버킷 정책을 복사 후 붙여넣은 뒤 저장합니다.
- 버킷 정책을 확인합니다.
🦈 3. 웹사이트 호스팅 시 index document에 입력한 Object 파일이 존재하지 않거나
- 이전에 [속성] > [정적 웹 사이트 호스팅 편집]에서 작성한 오류 문서를 통해 Object 파일이 존재하지 않을 때의 문제를 해결할 수 있습니다.
- error.html 파일 추가 후 하단의 업로드를 선택합니다.
테스트 코드입니다.
<!DOCTYPE html>
<html lang="ko">
<head>
    <meta charset="UTF-8">
    <meta name="viewport" content="width=device-width, initial-scale=1.0">
    <title>404 에러 페이지</title>
    <style>
        body {
            font-family: Arial, sans-serif;
            background-color: #f0f0f0;
            display: flex;
            justify-content: center;
            align-items: center;
            height: 100vh;
            margin: 0;
        }
        .error-container {
            text-align: center;
            background-color: white;
            padding: 2rem;
            border-radius: 8px;
            box-shadow: 0 4px 6px rgba(0, 0, 0, 0.1);
        }
        h1 {
            color: #e74c3c;
            font-size: 4rem;
            margin-bottom: 0;
        }
        p {
            color: #34495e;
            font-size: 1.2rem;
        }
        .back-link {
            display: inline-block;
            margin-top: 1rem;
            padding: 0.5rem 1rem;
            background-color: #3498db;
            color: white;
            text-decoration: none;
            border-radius: 4px;
            transition: background-color 0.3s;
        }
        .back-link:hover {
            background-color: #2980b9;
        }
    </style>
</head>
<body>
    <div class="error-container">
        <h1>404</h1>
        <p>죄송합니다. 요청하신 페이지를 찾을 수 없습니다.</p>
        <a href="#" class="back-link">홈으로 돌아가기</a>
    </div>
</body>
</html>
해당 error.html도 마찬가지로 공개 설정을 적용하지 않았다면 설정이 필요하며 버킷 정책을 편집한 2번의 경우엔 추가적인 설정은 필요하지 않습니다.
확인
정상적으로 배포된 것을 확인할 수 있습니다.
http://ss-s3-static-web-hosting-bucket.s3-website-us-east-1.amazonaws.com/
에러 페이지 또한 확인할 수 있습니다.
http://ss-s3-static-web-hosting-bucket.s3-website-us-east-1.amazonaws.com/test
추후 CloudFront 등을 통해 통합한다면 훨씬 저렴하게 사용할 수 있으며 CloudFront는 스마일샤크를 이용하는 경우 DTO 비용을 할인해드리고 있으니 참고해주세요.
댓글
댓글 0개
댓글을 남기려면 로그인하세요.